Learn all about git
25 August 2013 By Bhavyanshu Parasher
Overview
Alright i am going to show you few simple steps on how to start off using git.
Tutorial
Just follow these simple steps:
1) First of all set up your github account and verify your email address.
2) Then you have to fork this repository to your own profile. Look at the fork button on the repository page.
3) Now go to your own profile and you will find this repository has been added to your profile.
Now the real thing begins.
4) By using git shell, type
git clone repository-url //For example, repository-url in this case is "https://github.com/Society-of-Programming-Languages/TestingGit.git" & in your case it will be "https://github.com/'Your Github Username'/TestingGit.git".
5) Once you have cloned your forked repo, it will create a local directory on your hard disk starting with the name of the repo you just cloned.
6) Now go to above cloned directory, and update this README file by adding your name in it. (There is a section below that says “Contributors”. Update there and no where else)
7) Now comes commiting these changes to your forked repository. Simply use these sequence of commands in git shell. ->
git add . //This adds the files to the staging area.
git commit -m "Your message relating to the changes you have made"
git push -u origin master // This command pushes your changes to the repo server with remote as "origin" and branch as "master"
8) Now to finally make me accept the changes you have made, go to the github.com website and on the repo there is a tab called “Pull Request”. As soon as you make changes, you will see a tab under “Pull Request” something saying like “Create Pull Request”. This means that you have made some changes in your forked repository, and you want me to incorporate those changes to my original repository. (Often known as patches if they fix some issue).
9) That’s all. If you followed each step carefully, you have got the whole idea behind git. There is “Issues” tab for creating issues regarding a particular code. You can create issues and a discussion can be held right there with everyone being notified about it.
VERY VERY IMPORTANT NOTE: If you see some message saying that your “branch is behind something something”, all it means is that you have not incorporated changes made by someone else. To do that simply open shell and go typing the following commands.
git remote -v //Lists the names of remotes for a repository.

git remote add upstream https://github.com/Society-of-Programming-Languages/TestingGit.git //Adds a new remote named "upstream". You can name it anything.

git remote -v //Check if upstream has been added.

git fetch upstream //Fetch all the branches of that remote into remote-tracking branches, such as upstream/master

git checkout master //Very important in order to switch to master branch of upstream
Rewrite your master branch so that any commits of yours that aren’t already in upstream/master are replayed on top of that other branch:
git merge upstream/master
That’s it. Now you can carry on with “git push origin master”, to make all the updated changes to you repo on github.
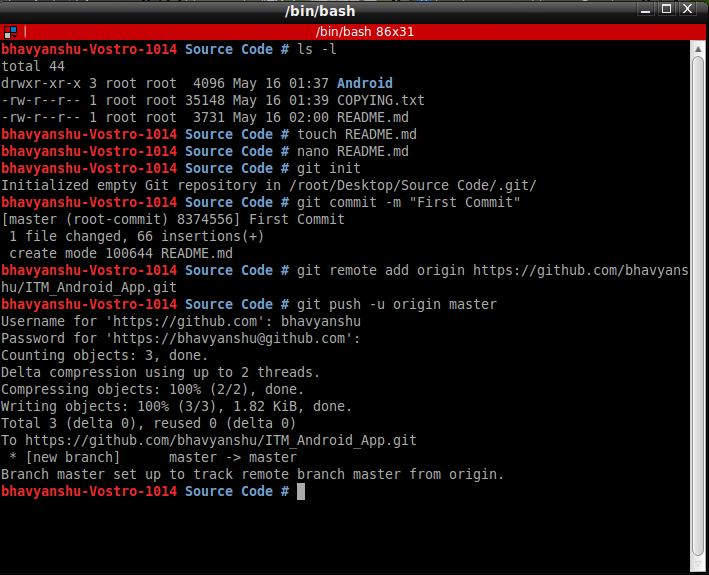
How to initialize a project for Git
Look at the image below

So let me quickly explain what i did here
In this tutorial, the first command, nano README.md is used to create a README file for the project. Then we have used “git init” command to initialize an empty git repository. The “git remote add origin ‘url’” adds a remote for our repository. Then when we have made a change to the file and we want to commit to the reposiroty we use the following sequence of commands. First we modify the file by using any editor. Then we use the command “git add ‘filename’ to stage the file. Then we use the command “git commit -m “Your message about the change”. After that we use the command “git push -u origin master” in order to finally add the file to the master branch of the repository on the server. That’s how you contribute to the repositories.
blog comments powered by Disqus