How to use your raspberry pi as a radio signal transmitter
26 October 2014 By Bhavyanshu Parasher
Overview
Before getting into this topic, I would like you to know that FM transmission is illegal in India and in many other countries if you don’t have a license. You need to have a license if you want to transmit a signal at a particular frequency. All the registered broadcast radio stations and other private organizations have one. Also you must only transmit between 87.5 to 108.0 MHz as the frequencies below 87.5 are reserved for use by government agencies. Your raspberry pi can transmit from 1 MHz to 250 MHz. I would suggest you to be very careful with this and only do it for educational purpose. I do not claim any responsibility for any damage to anything or anyone caused by this.
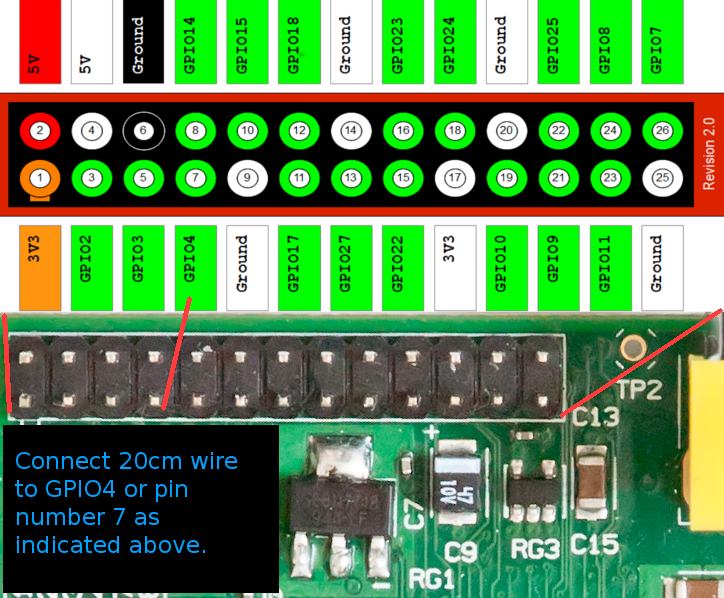
Now that I am done with the boring disclaimer, I think we should get started with it and have some fun. So the basic idea is that it uses one of the GPIO pins on raspberry pi which generates spread-spectrum clock signals. SSCG is used in synchronous digital systems, having a microprocessor, to reduce the EMI (Electromagnetic Interference) that these systems generate. These help reduce the peak radiated energy and hence the EMI, to comply with electromagnetic compatibility (EMC) regulations. Have you ever heard of the phrase “overclocking a processor”? It is generally used by people involved in gaming. In computer systems also SSCG is enabled by default. The spread spectrum can lower maximum clock speed achievable due to clock skew. Disabling spread spectrum clocking in computer is useful for overclocking. Coming back to raspi experiment, all you need to do to turn the raspi into a radio transmitter is to hook up a wire of 15 cm into GPIO4 (pin 7, see figure shown below) and run a C program which takes certain number of arguments. The program is popularly known by the name of PiFM, originally written by Oliver Mattos and Oskar Weigl.

Running the program
If you are already using linux and are comfortable with command line interface, you would not find it difficult at all. Can’t say about windows users. Let’s take it step by step from here :
- Hook up your raspberry pi with the ethernet cable and set it up for ssh connection. (Optional phase)
- Use your laptop and login to your raspi.
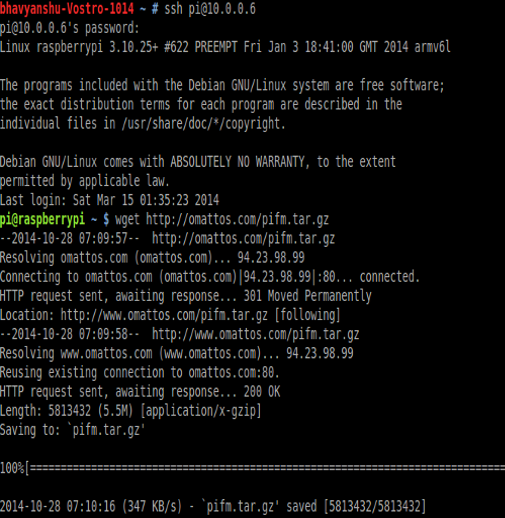
- cd to your preferable directory and execute wget command as shown below.
wget http://omattos.com/pifm.tar.gz

- Let it finish downloading. Once it is done downloading, you must extract it using tar command, like shown below.
tar -xvf pifm.tar.gz

- Now that it is extracted, we must execute it. Note that the tar file contains both source file as well as binary file. To execute it, run
sudo ./pifm sound.wav 100.1
The program needs wav file and frequency (in MHz) as arguments. To test if it is working, bring any FM radio player (Like mobile phones of pre smartphone era which had FM radio as a feature) closer to pi to hear Star Wars theme song playing. Once it is done playing the music file it will exit out by printing “Exiting” to stdout just like in image shown below.

Now this is the basic operation. It has got number of other operations. It is no more restricted to wav files. You can also play mp3 by using ffmpeg. To get ffmpeg in raspberry pi, just use
sudo apt-get update ; sudo apt-get install ffmpeg
There is also a PirateRadio project that allows you to use pifm with a playlist, multiple audio formats, shuffle, repeat and has lot of other options. At the time of writing, PirateRadio project needs some tweaking to get it working. I had to modify PirateRadio.py file for correct directory location of conf file and few other minor changes but it works perfectly well. I have already tested it. If you get stuck anywhere, leave a comment and I will help you sort it out.
That’s all for now. Enjoy this little hack but be careful. You might end up pissing off a lot of people.
View more tutorials on Raspberry Pi.
blog comments powered by Disqus