Provide multiple language support in your android app
20 August 2015 By Bhavyanshu Parasher
Overview
Supporting multiple languages in android app is one of the most important tasks. Try to do it from the beginning otherwise you will end up with lots of strings to translate by the end. If you are not in a habbit of writing each and every string in strings.xml file then you probably should start doing that because it is easier to manage translations that way. We will see that how it is possible to do so.
Let’s code
Create a new android app project. Just like you normally would. I ain’t gonna tell you how to do that. In that open up strings.xml file and one thing I found very useful in new Android studio is that it has an inbuilt translation editor which is pretty useful. Before opening the translation editor, open your strings.xml file and write some strings in it. (Showing support for hindi in this tutorial)
strings.xml
<?xml version="1.0" encoding="utf-8"?>
<resources>
	<!-- Menu -->
    <string name="action_settings">Settings</string>
    <string name="action_search">Search</string>
    <string name="action_logout">Logout</string>
    <string name="action_devinfo">Developer</string>
    <string name="share_app">Share App</string>
    <string name="language_setting">Change Language</string>
    <string name="action_change_pass">Change Password</string>
</resources>
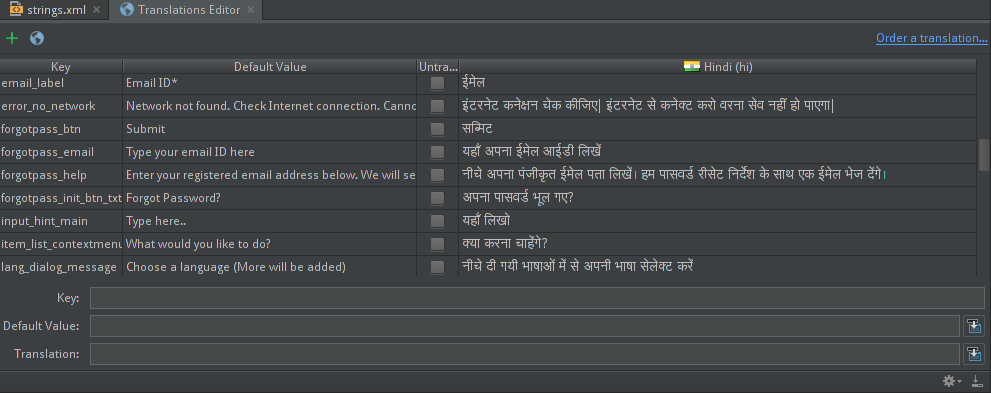
Add more if you want to. Now see the image below, the translation editor looks like this.

In that you have buttons for Add key and Add Locale. Click Add Locale and select the language you wish to translate the strings to. Like I selected Hindi, so mine looks like that. What it basically does is that in res/ folder of the project, it creates values-hi folder. In that there is strings.xml file specifically having all the translated strings for that particular language. The keys will remain the same. Now let us quickly write translations for it. I prefer to use the editor initially. Order does not matter. If you want to copy/paste just to try, open strings.xml file in res/values-hi/ folder and add the following.
res/values-hi/strings.xml
<?xml version="1.0" encoding="utf-8"?>
<resources>
	<!-- Menu -->
	<string name="action_devinfo">डेवेलपर</string>
    <string name="action_logout">लॉग आउट</string>
    <string name="action_search">खोज</string>
    <string name="action_settings">सेटिंग</string>
    <string name="share_app">एप शेयर कीजिए</string>
    <string name="language_setting">भाषा बदलें</string>
    <string name="action_change_pass">पासवर्ड बदलें</string>

    <!-- Language select dialog -->
    <string-array name="lang_select">
        <item>English</item>
        <item>Hindi</item>
	</string-array>
</resources>
Next we add items to menu in which one would be used to show custom language selection dialog. Create new file in res/menu/ called menu_main.xml.
menu_main.xml
<menu xmlns:android="http://schemas.android.com/apk/res/android"
    xmlns:app="http://schemas.android.com/apk/res-auto"
    xmlns:tools="http://schemas.android.com/tools"
    tools:context=".MainActivity">

    <item
        android:id="@+id/action_settings"
        android:orderInCategory="100"
        android:title="@string/action_settings"
        android:icon="@drawable/ic_overflow"
        app:showAsAction="ifRoom">
        <menu>
            <item
                android:id="@+id/action_logout"
                android:orderInCategory="99"
                app:showAsAction="never"
                android:title="@string/action_logout"/>

            <item
                android:id="@+id/action_changepass"
                android:orderInCategory="95"
                app:showAsAction="never"
                android:title="@string/action_change_pass"/>

            <item
                android:id="@+id/action_devinfo"
                android:orderInCategory="80"
                android:title="@string/action_devinfo"
                app:showAsAction="never"/>

            <item
                android:id="@+id/action_share_app"
                android:orderInCategory="70"
                android:title="@string/share_app"
                app:showAsAction="never"/>

            <item
                android:id="@+id/action_change_language"
                android:orderInCategory="60"
                android:title="@string/language_setting"
                app:showAsAction="never"/>
        </menu>
    </item>
</menu>
Before we move onto the java part, let us quickly create a custom dialog layout with a spinner in it to select our languages from.
language_dialog.xml
<LinearLayout xmlns:android="http://schemas.android.com/apk/res/android"
    xmlns:tools="http://schemas.android.com/tools"
    android:layout_width="match_parent"
    android:layout_height="match_parent"
    android:padding="10dp"
    android:orientation="vertical">

    <Spinner
        android:id="@+id/spinner1"
        android:layout_width="match_parent"
        android:layout_height="wrap_content"
        android:entries="@array/lang_select"
        android:prompt="@string/language_setting"
        android:padding="10dp"
        />

</LinearLayout>
Now in your package, create a new blank activity called MainActivity and add following code in it.
MainActivity.java
In onOptionsItemSelected(MenuItem item) add the following,
@Override
public boolean onOptionsItemSelected(MenuItem item) {
int id = item.getItemId();

    switch (id) {
    	case R.id.action_change_language:
            showChangeLangDialog();
            return true;

        //similarly write for other actions

        default:
            return super.onOptionsItemSelected(item);
    }
    return true;
}
Now add the following method after onOptionsItemSelected(),
public void showChangeLangDialog() {
    AlertDialog.Builder dialogBuilder = new AlertDialog.Builder(this);
    LayoutInflater inflater = this.getLayoutInflater();
    final View dialogView = inflater.inflate(R.layout.language_dialog, null);
    dialogBuilder.setView(dialogView);

    final Spinner spinner1 = (Spinner) dialogView.findViewById(R.id.spinner1);

    dialogBuilder.setTitle(getResources().getString(R.string.lang_dialog_title));
    dialogBuilder.setMessage(getResources().getString(R.string.lang_dialog_message));
    dialogBuilder.setPositiveButton("Change", new DialogInterface.OnClickListener() {
        public void onClick(DialogInterface dialog, int whichButton) {
            int langpos = spinner1.getSelectedItemPosition();
            switch(langpos) {
                case 0: //English
                    PreferenceManager.getDefaultSharedPreferences(getApplicationContext()).edit().putString("LANG", "en").commit();
                    setLangRecreate("en");
                    return;
                case 1: //Hindi
                    PreferenceManager.getDefaultSharedPreferences(getApplicationContext()).edit().putString("LANG", "hi").commit();
                    setLangRecreate("hi");
                    return;
                default: //By default set to english
                    PreferenceManager.getDefaultSharedPreferences(getApplicationContext()).edit().putString("LANG", "en").commit();
                    setLangRecreate("en");
                    return;
            }
        }
    });
    dialogBuilder.setNegativeButton("Cancel", new DialogInterface.OnClickListener() {
        public void onClick(DialogInterface dialog, int whichButton) {
            //pass
        }
    });
    AlertDialog b = dialogBuilder.create();
    b.show();
}

public void setLangRecreate(String langval) {
    Configuration config = getBaseContext().getResources().getConfiguration();
    locale = new Locale(langval);
    Locale.setDefault(locale);
    config.locale = locale;
    getBaseContext().getResources().updateConfiguration(config, getBaseContext().getResources().getDisplayMetrics());
    recreate();
}
Now the most important part is how to read from the preferences and get the correct language. Add in onCreate()
SharedPreferences settings = PreferenceManager.getDefaultSharedPreferences(this);
Configuration config = getBaseContext().getResources().getConfiguration();

String lang = settings.getString("LANG", "");
if (! "".equals(lang) && ! config.locale.getLanguage().equals(lang)) {
    Locale locale = new Locale(lang);
    Locale.setDefault(locale);
    config.locale = locale;
    getBaseContext().getResources().updateConfiguration(config, getBaseContext().getResources().getDisplayMetrics());
}
Now run the app, open menu and select language change, you will see a dialog popup. Select the language and click “Change”. It will recreate the activity and use all available translations. Also, it will apply those changes to SharedPreferences so that next time someone opens the app, they will see the last selected language.
That’s all. If you have any questions, post them below.
blog comments powered by Disqus