C and Python implementation for RaspberryPi to detect movement using PIR motion sensor (HC-SR501)
21 November 2014 By Bhavyanshu Parasher
Overview
I recently bought a motion detection sensor HC-SR501. First, we will see how to connect it to our raspberry pi and then we will run the C code which helps us detect motion. Once the movement has been detected, it will set LED to HIGH and play an audio (.wav) file. There are a lot of python implementations for it out there but if you are interested in specifically using C for this, then you have come to the right place.
Hardware
- Breadboard
- Jumper Wires
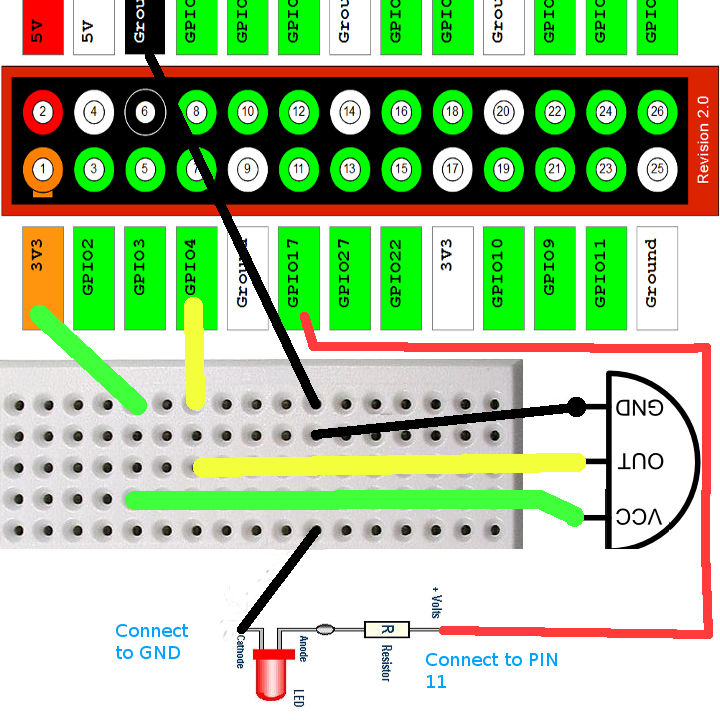
- 4.7K ohm resistor (If using +5 volt - PIN 2) else no resistor required, if using +3.3V (PIN 1). See diagram below.
- HC-SR501
- 3.5 mm jack speaker/headphones (Optional, if you want sound)
- Raspberry Pi (I am using model B revision 2)
We connect board pin number 1 (+3.3 V) to the VCC of the sensor, pin number 6 for GND and finally pin number 7 as data input from the sensor to raspberry pi. PIR sensors work by detecting a change in the infrared radiation level in the detection region. So when there is no movement, the digital out pin on the sensor will remain LOW but as soon as there is a movement in the detection range, it will go HIGH and our Raspberry Pi will be able to sense this change when we run our C program. Next we connect anode of LED to pin number 11 and cathode to GND. Look at the figure below to understand the connections. It may not be the best diagram ever but this is all I have for now.

The fun begins
Please make sure your connections are correct. If you are using some other pins then keep them in mind. You will have to change the #define SENSOR and #define LED macro in that case. The below given C program depends on bcm2835 library. It will not compile without it. First copy paste the contents of pir.c file or you can find the raw file here.
pir.c file :
/**
 * Program for PIRsensor. Detects movement and activates connected LED
 * for 2 seconds.
 * Connect on board pin number 07 to Sensor, 11 to LED
 * - Refer RPiGPIOPin section of
 *   http://www.airspayce.com/mikem/bcm2835/group__constants.html
 */

#include <bcm2835.h>
#include <stdio.h>
#include <stdlib.h>
#include <time.h>

#define SENSOR RPI_GPIO_P1_07
#define LED RPI_GPIO_P1_11
#define ACTIVE_VALUE 1

int main(int argc, char **argv)
{
	if (!bcm2835_init()) {
	printf("Please run this with sudo\n");
	return EXIT_FAILURE;
	}

	bcm2835_gpio_fsel(SENSOR, BCM2835_GPIO_FSEL_INPT);//SENSOR as input
	bcm2835_gpio_fsel(LED, BCM2835_GPIO_FSEL_OUTP);	   //LED as output
	bcm2835_gpio_set_pud(SENSOR, BCM2835_GPIO_PUD_UP);
	uint8_t state = ACTIVE_VALUE; //Init state to HIGH

	while (1) {
		state = bcm2835_gpio_lev(SENSOR); //HIGH or LOW?
		if(state != ACTIVE_VALUE)
		{
			//Sensor not active
		}
		else
		{
			printf("Movement at %d\n",(int)time(NULL));
			bcm2835_gpio_set(LED);
			/* Comment out both system() lines
			if don't wanna play wav file */
			system("omxplayer beep.wav");
			sleep(2);
			//Another extra overhead!
			system("killall omxplayer.bin");
			bcm2835_gpio_clr(LED);
		}
	}
	bcm2835_close();
	return EXIT_SUCCESS;
}
#undef SENSOR
#undef LED
#undef ACTIVE_VALUE
You will have to install the library manually using
$ wget http://www.open.com.au/mikem/bcm2835/bcm2835-1.5.tar.gz
$ tar zxvf bcm2835-1.5.tar.gz
$ cd bcm2835-1.5
$ ./configure
$ make
$ sudo make check
$ sudo make install
and then compile the pir.c using
gcc pir.c -o pir -l bcm2835
To run it, use
sudo ./pir
It has to be run as root for it to be able to access hardware.
That’s all. Now move around the sensor. You will see LED is HIGH while you move and the .wav file also plays. Once you stand still, the LED will go off too. If there is an audio issue, take a look at this or post a comment below.
Now let us quickly go through python implementation as well. Raw File
pir.py file :
#!/usr/bin/env python

# Info - This program is for PIR sensor. Contionusly checks for state,
#        set LED if movement detected and plays wav file on detection.

import RPi.GPIO as GPIO
import time
import pygame

pygame.mixer.init()
pygame.mixer.music.load("beep.wav")

PIR = 7		# On-board pin number 7 (GPIO04)
LED = 11	# On-board pin number 11 (GPIO17)

state = False
val = False

GPIO.setmode(GPIO.BOARD)	# Change this if using GPIO numbering
GPIO.setup(PIR, GPIO.IN)	# Set PIR as input
GPIO.setup(LED, GPIO.OUT)	# Set LED as output

try:
	while True:
		val = GPIO.input(PIR)		# read input value
		if (val == True):		# check if the input is HIGH
			GPIO.output(LED, True)	# turn LED ON
			if (state == False):
				# ON
				pygame.mixer.music.play()
				state = True
		else:
			GPIO.output(LED, False)	# turn LED OFF
			if (state == True):
				# OFF
				time.sleep(2)
				state = False;
except KeyboardInterrupt:
	GPIO.cleanup()
Run above using
sudo python pir.py
That’s all. Test it out and if you get stuck, just post in the comments below. I will help you out.
blog comments powered by Disqus