Styling laravel 5 based app with twitter bootstrap
23 August 2015 By Bhavyanshu Parasher
If you have not setup laravel project yet, then follow my first tutorial on how to setup laravel & xampp on linux. If you already have everything configuered then you may skip it.
Let’s begin
Run sudo npm install in project root to get bootstrap-sass and laravel-elixir. You can also get bootstrap with bower (see below) but you need laravel-elixir.
Setup bower
Bower is a package manager for Javascript libraries that allows you to define, version, and retrieve your dependencies.
-
First we install bower,
sudo npm install -g bower -
Next, go to project root and create file called .bowerrc and add the following in it
{ "directory": "resources/assets/vendor" } -
Next, we create bower.json file in project root and add the following in it
{
    "name": "AppName",
    "dependencies": {
      "bootstrap": "~3.3.5"
    }
}
This will pull in jquery as well. Replace AppName with the name you had set using
sudo php artisan app:name. -
Finally do,
bower updatein command line and it should get all the dependencies. You should now have following folders.bootstrap#3.3.5 resources/assets/vendor/bootstrap jquery#2.1.4 resources/assets/vendor/jquery
Setup gulp
gulp is a toolkit that will help you automate painful or time-consuming tasks in your development workflow. For web development (if that’s your thing) it can help you by doing CSS preprocessing, JS transpiling, minification, live reloading, and much more.
-
Open file resources/assets/sass/app.scss. In that remove all contents and just add the following line,
@import "node_modules/bootstrap-sass/assets/stylesheets/bootstrap"; -
Next open file called gulpfile.js located in project root and in that edit
elixir()to tell gulp where to move required .js and fonts from andsass()compiles the sass sources.elixir(function(mix) { var bpath = 'node_modules/bootstrap-sass/assets'; var jqueryPath = 'resources/assets/vendor/jquery'; mix.sass('app.scss') .copy(jqueryPath + '/dist/jquery.min.js', 'public/js') .copy(bpath + '/fonts', 'public/fonts') .copy(bpath + '/javascripts/bootstrap.min.js', 'public/js'); }); -
Next we install gulp using,
sudo npm install -g gulp -
Now finally we execute gulp in project root
sudo gulp
After it is finished copying all the files, our public directory tree should look like
learn-laravel5/public/
|-- css
|   |-- app.css
|   `-- app.css.map
|-- favicon.ico
|-- fonts
|   `-- bootstrap - all font files in here
|-- index.php
|-- js
|   `-- bootstrap.min.js
|   `-- jquery.min.js
`-- robots.txt
Now we have got jquery and bootstrap setup. We can now test them by including them in our blade template.
Styling laravel blade template with twitter bootstrap
Edit your project’s composer.json file to require laravelcollective/html by adding "laravelcollective/html": "~5.0" in the “require”:{}. This is required in laravel 5 because HTML class has been taken under laravelcollective package since it was removed from core framework. In laravel 4, it was always with the core framework. Now your composer.json should have,
"require": {
    "php": ">=5.5.9",
    "laravel/framework": "5.1.*",
    "laravelcollective/html": "~5.0"
},
Now we run sudo composer update to get HTML class. Once that is done, we add new provider to the providers array of config/app.php:
'providers' => [
// ...
'Collective\Html\HtmlServiceProvider',
// ...
],
Finally, add two class aliases to the aliases array of config/app.php:
'aliases' => [
// ...
  'Form' => 'Collective\Html\FormFacade',
  'Html' => 'Collective\Html\HtmlFacade',
// ...
],
You may delete resources/views/welcome.blade.php and create new file called baselayout.blade.php in views directory. In that add,
<!DOCTYPE html>
<html>
    <head>
        <title>Laravel is awesome</title>

        {!! Html::style('css/app.css') !!}

        {!! Html::script('js/jquery.min.js') !!}
        {!! Html::script('js/bootstrap.min.js') !!}

        <style>
		body { padding-top: 60px; }
		@media (max-width: 979px) {
			body { padding-top: 0px; }
		}
        </style>
    </head>

    <nav class="navbar navbar-default navbar-fixed-top">
        <div class="container">
            <div class="navbar-header">
              <button type="button" class="navbar-toggle collapsed" data-toggle="collapse" data-target="#navbar" aria-expanded="false" aria-controls="navbar">
                <span class="sr-only">Toggle navigation</span>
                <span class="icon-bar"></span>
                <span class="icon-bar"></span>
                <span class="icon-bar"></span>
            </button>
            <a class="navbar-brand" href="#">Project name</a>
            </div>
            <div id="navbar" class="collapse navbar-collapse">
                <ul class="nav navbar-nav">
                    <li><a href="">Home</a></li>
                    <li><a href="">About</a></li>
                    <li><a href="">Contact</a></li>
                </ul>
            </div><!--/.nav-collapse -->
        </div>
    </nav>

    <body>
        <div class="container">
            @yield('content')
        </div><!-- /.container -->
    </body>
</html>
Next we create content specific to our pages. We would want different content for Home, About and Contact pages. In this tutorial, I will only show home.blade.php with a small form. We will use @section('content') to indicate start of content section. Create a new file named home.blade.php inside views folder just like you created baselayout.blade.php. But in this, we will only add sections and nothing else. Edit the content of sections according to your need. For example,
@extends('baselayout')

@section('content')

<div class="row">
	<h1>Welcome to my website</h1>
	<p>We are creating something beautiful today.</p>
	<p>Lorem ipsum dolor sit amet, consectetur adipisicing elit, sed do eiusmod
	tempor incididunt ut labore et dolore magna aliqua. Ut enim ad minim veniam,
	quis nostrud exercitation ullamco laboris nisi ut aliquip ex ea commodo
	consequat. Duis aute irure dolor in reprehenderit in voluptate velit esse
	cillum dolore eu fugiat nulla pariatur. Excepteur sint occaecat cupidatat non
	proident, sunt in culpa qui officia deserunt mollit anim id est laborum.</p>

	<h2>Sign In</h2>
	{!! Html::ul($errors->all(), array('class'=>'errors')) !!}

	{!! Form::open(array('url' => 'signin','class'=>'form-inline')) !!}

	{!! Form::label('email', 'E-Mail Address') !!}
	{!! Form::text('email', 'example@gmail .com', array('class' => 'form-control')) !!}
	{!! Form::label('password', 'Password') !!}
	{!! Form::password('password', array('class' => 'form-control')) !!}

	{!! Form::submit('Sign In' , array('class' => 'btn btn-primary')) !!}
	{!! Form::close() !!}
</div>

@stop
Now, we need to setup routing to show this view. Open app/Http/routes.php file and in that change welcome to home, like
Route::get('/', function () {
    return view('home');
});
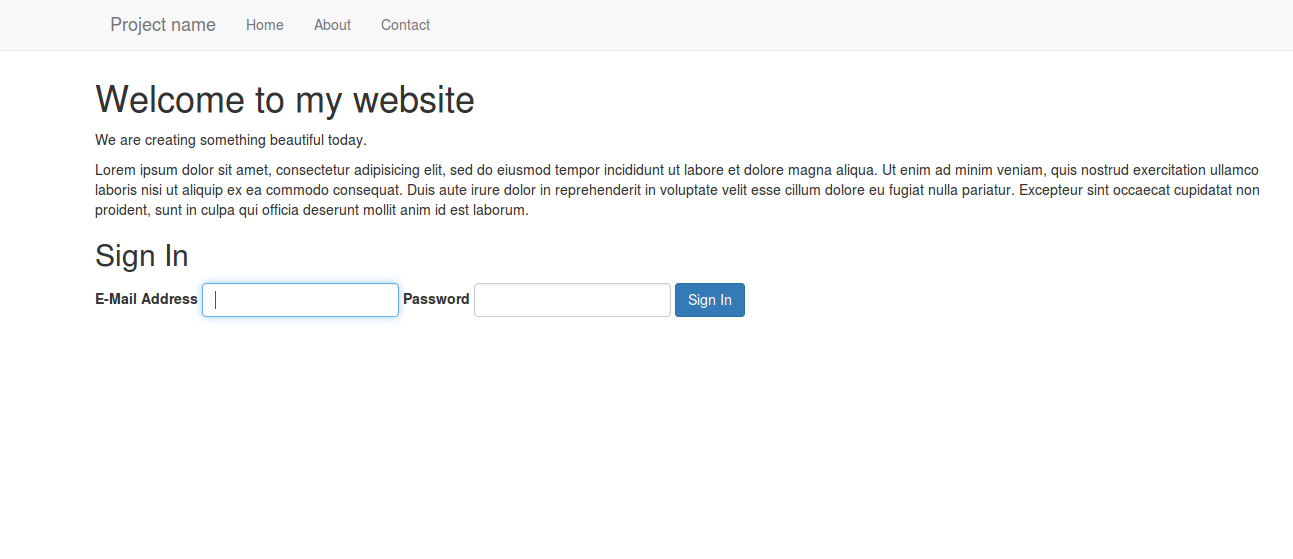
Now visit http://localhost:8000 and it should show you something like this.

That’s all. Note that the form will not work because there is no route for its action. We gonna see routing in next tutorial. In the meantime, you can continue building other pages in similar way. Find more laravel 5 tutorials here.
blog comments powered by Disqus